
Home Lab SSD Encryption
Recently I rebuilt a home server which acts as a NAS for my personal data. I wanted to make sure the data would be secure in the event of the server being stolen, ideally with:
- Reasonably secure encryption (targeted attacks will get the data one way or another)
- Low performance overhead, since the machine isn’t high spec
- The ability to be unlocked remotely in the event of a power outage
Solution
Once I started to consider different options, I was surprised to discover that not only are almost all modern SSDs actually “Self-Encrypting Drives” (SEDs) - meaning that they come with support for hardware full-disk encryption - but that this encryption is always active. From ArchWiki:
In fact, in drives featuring full-disk encryption, data is always encrypted with the data encryption key when stored to disk, even if there is no password set (e.g. a new drive). Manufacturers do this to make it easier for users who do not wish to enable the security features of the self-encrypting drive. These self-encrypting drives can be thought of as having a zero-length password by default that always transparently encrypts the data (similar to how passwordless SSH keys can provide somewhat secure access without user intervention).
Security
SEDs conforming to TCG Opal 2.0 use 128-bit block sizes with 128-bit and 256-bit AES keys. Also, by encrypting data at the hardware level, these drives are less vulnerable to software-based attacks.
Performance
Hardware encryption means that it’s the drive performing the encryption/decryption, not the CPU, so there is no performance overhead. Furthermore, the advertised read/write performance of the SSD isn’t impacted either since the encryption takes place whether or not it’s used to secure the data.
Remote Unlock & Setup
I expected this to be the trickiest part of my requirements to satisfy, but once I came across sedunlocksrv-pba, it turned out to be quite straightforward:
Fully encrypt your home server or NAS and conveniently unlock it on startup without the need to attach monitor and keyboard. Unlocking can be done from any device on your LAN with a browser. By default a self-signed HTTPS certificate is used (generated during building) to secure the unlocking.
To get things set up, I suggest first verifying that you have a TGC OPAL-compatible SED drive by following the instructions on sedutil.com.
Next prepare the PBA image with docker (there are other build methods available). This is the custom image containing a remotely accessible web interface for unlocking the SED drive on boot. Personally, I opted to use the ChubbyAnt fork of sedutil and enable SSH unlocking in addition to web-based.
This required a change to the Dockerfile CMD command:
FROM --platform=amd64 ubuntu:22.04

ENV DEBIAN_FRONTEND=noninteractive

RUN apt update && \
  apt install -y cpio curl dosfstools dropbear fdisk git golang-go grub-efi-amd64-bin grub-efi-ia32-bin grub-pc-bin grub2-common libarchive-tools rsync squashfs-tools udev wget xorriso

WORKDIR /tmp
COPY . .

# Changed line
CMD SEDUTIL_FORK="ChubbyAnt" ./build.sh SSH
Then the process was:
git clone git@github.com:Jip-Hop/sedunlocksrv-pba.git
cd sedunlocksrv-pba
vi ssh/authorized_keys # Add public key as per ssh/authorized_keys.example
(NAME=sedunlocksrv-pba; docker build -t $NAME . && docker run --name $NAME --privileged $NAME && docker cp $NAME:/tmp/sedunlocksrv-pba.img sedunlocksrv-pba.img; docker rm $NAME)

# Output after image build and PBA compilation
Successfully copied 43MB to /home/dietpi/src/sedunlocksrv-pba/sedunlocksrv-pba.img
sedunlocksrv-pba
Once that’s complete, the next steps describe how to configure a password for the SED drive, enable locking, and finally flash the PBE image created above from a USB drive into the shadow master boot record (MBR) of the drive in question. Obviously it goes without saying that you should back up the data on the drive first, just in case.
Usage
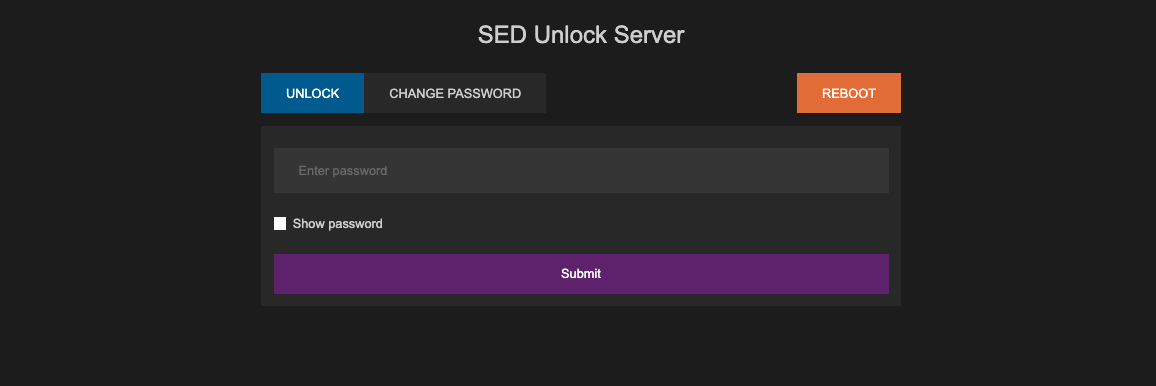
Here’s how it works once everything’s set up:
-
The server powers up and detects that the SED drive is locked, so boots the PBA image from the shadow MBR.
-
The PBA then starts simple web interface and SSH server. By default a self-signed HTTPS certificate is used.
-
The router or firewall can be configured to forward traffic to the IP of the machine in question, making it publically accessible for entering the password. Alternatively, the router (or another machine on the network which comes online after a power failure) could be configured to join a VPN, providing more secure external access.
-
Entering the password and clicking reboot unlocks the drive and reboots using the actual MBR into whatever OS is installed. The drive will stay unlocked until the next power cycle.
Note: setting the same password for multiple drives allows them all to be unlocked in one go.
Final Notes
-
The specific machine I was configuring was a Mac Mini 2012. That needs a small modification to ensure that it would boots up when power is restored:
setpci -s 0:1f.0 0xa4.b=0. -
I’d love to extend this solution to support exposing the web interface onto a Tailscale tailnet. Others have had success with this for remote boots using
mkinitcpiohooks.